Build a realtime social bookmark manager with Vue.js and Horizon
 Ryan Paul

September 14: This post has been updated to use the Horizon 2.0 API.
In this tutorial, I’ll demonstrate how to build a social bookmark manager with Horizon and the Vue.js frontend framework. You can build the entire application without writing a single line of backend code. This tutorial also covers some of the best practices for developing with Horizon.
First steps
If you’re completely new to Horizon, you might want to peruse the Getting Started guide before you dive into into building your first application. If you would like to follow along, you can install Horizon from the npm repository.
After you install Horizon, you can run hz init thinkmark to create a new
Horizon project called thinkmark. In the new thinkmark directory, you can
find the standard Horizon configuration in .hz/config.toml. You can adjust the
settings in the toml file. You can type hz serve to run the application
from the command line.
When I start a new project, I typically run hz serve with the --dev
parameter to turn on development mode. When Horizon runs in development mode,
the permission system is disabled and the server automatically creates new
database collections and indexes as needed. Development mode is obviously not
safe for a production application, but it’s ideal for rapid prototyping. As you
will see later in this tutorial, I typically use Horizon with the --dev option
until I’m ready to start implementing and testing permissions.
Authentication

Authentication and identity management are important parts of any multiuser web application, but the underlying plumbing is often tedious to implement. Horizon’s built-in authentication and permission systems make it easier for frontend developers to build realtime web applications that incorporate user accounts and rule-based security without writing any backend code.
Horizon supports authenticating users via third-party OAuth providers. The Horizon server and frontend client library handle most of the authentication process, insulating developers from OAuth’s complexity and general unpleasantness.
Initial Setup
To use a third-party OAuth provider in your Horizon application, you have to
obtain a key from the desired OAuth service and add it to your application’s
.hz/config.toml file. I used GitHub as the authentication provider in my demo
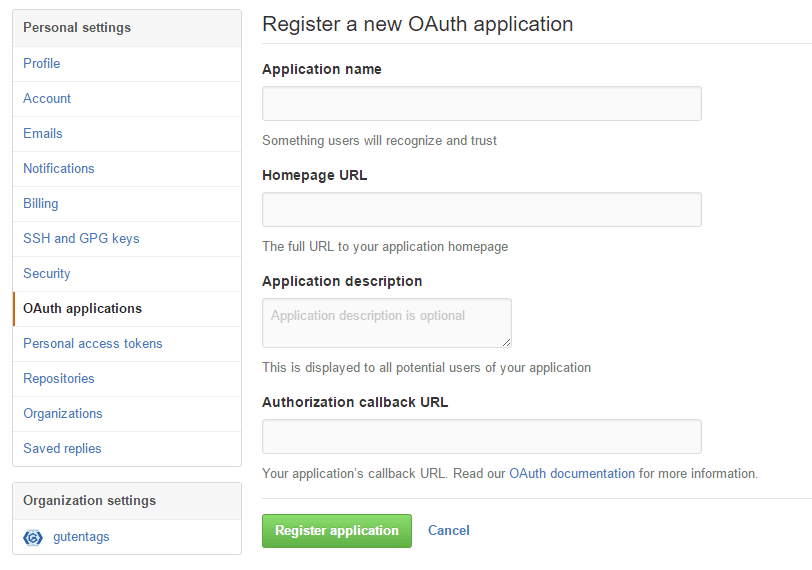
application. On the GitHub website, you can register a new application by
visiting the OAuth applications pane in account settings.
In the Authorization callback URL field, put the public internet address of your Horizon application. When a user completes the authentication process, GitHub redirects the user back to your application with the address you provide in the callback field. Be sure that the address points to the top-level root of your Horizon application, not an arbitrary path.
When you finish registering your OAuth application, GitHub will give you a
client ID and a client secret. Horizon needs both of those values in order use
GitHub as an authentication provider. Out of the box, the config.toml file
generated by the hz init command includes sample configurations for several
OAuth providers. All you have to do is uncomment the one that you want to use,
and then paste in the ID and secret key:
token_secret = "xxxxxxxxxxxxxxxxxxxxxxxxxxxxxxxxxxxxxxxxxxxxxxxxxxxxx"
allow_anonymous = false
allow_unauthenticated = true

[auth.github]
id = "xxxxxxxxxxxxxxxxxxxx"
secret = "xxxxxxxxxxxxxxxxxxxxxxxxxxxxxxxxxxxxxxxx"
Keep in mind that using a third-party OAuth provider generally requires you to serve your application to the public internet and set up SSL certificates. If you are developing your application on your own computer within a firewall, you could try using a tool like ngrok to expose Horizon to the broader internet.
To learn more about OAuth configuration and the OAuth providers supported in Horizon, you can visit the Horizon documentation.
Identify authenticated users
Under the hood, Horizon uses JSON Web Tokens (JWT) to identify authenticated users. The Horizon client library relies on browser local storage to save the tokens across sessions. When the client connects to the server to perform a query, it automatically passes along the token from local storage to identify the user.

When your application starts, you can invoke the hasAuthToken method on a
Horizon client instance to determine if the user has an existing authentication
token in local storage. If a token is available, you can perform a currentUser
query to fetch the user’s account information:
const horizon = Horizon();

if (horizon.hasAuthToken())
  horizon.currentUser().fetch().subscribe(user =>
    console.log(`The user's ID is: ${user.id}`));
In the internal database for your Horizon application, all of your application’s
users are represented by corresponding documents in the users table. The
currentUser method returns the document associated with the active user.
Authentication flow
When a user wants to log in, redirect them to the Horizon server endpoint that
initiates the authentication process for the given OAuth provider. You can get
the path by calling the authEndpoint method and specifying the desired
provider. You can pass the return value to window.location.replace(endpoint)
to perform the redirect:
const horizon = Horizon();

horizon.authEndpoint("github").subscribe(endpoint =>
  window.location.replace(endpoint);
Horizon sends the user to the GitHub website, which displays a prompt that that asks for permission to complete the login. When the user grants permission, GitHub redirects the user back to your Horizon application and adds a special access token to the URL as a query parameter. Horizon automatically extracts the token from the URL and uses it to generate the JWT that it saves in local storage.
Logout
When the user wants to log out of your Horizon application, all you have to do is delete the JWT from local storage. The Horizon client library provides a simple convenience method for performing that task:
Horizon.clearAuthTokens();
To log the user back in, redirect them to the authentication endpoint again. For subsequent logins, the OAuth provider will not prompt them to explicitly grant permission.
A working example built with Vue.js
In a Vue.js application, you can use a simple v-if directive to display
different views to authenticated and unauthenticated users. In the following
example, users who are not authenticated see a simple link that they can click
to login. Authenticated users see a greeting that displays their user ID and a
link that allows them to logout.
<div id="app">
  <div v-if="userId">
    <p>You are logged in! Your user ID is: {{userId}}</p>
    <p>Click <a @click="logout">here</a> to logout</p>
  </div>

  <div v-if="!userId">
    <p>I don't know you. You should <a @click="login">login</a>.</p>
  </div>
</div>

<script>
  const horizon = Horizon();

  let app = new Vue({
    el: "#app",
    data: {userId: null},
    ready() {
      if (horizon.hasAuthToken())
        horizon.currentUser().fetch().subscribe(user => this.userId = user.id);
    },
    methods: {
      login(ev) {
        horizon.authEndpoint("github").subscribe(endpoint =>
          window.location.replace(endpoint);
      },
      logout(ev) {
        Horizon.clearAuthTokens();
      }
    }
  });
</script>
When Vue initializes, it triggers the application’s ready event handler. The
handler invokes hasAuthToken to check for a JWT in local storage. If it finds
a token, it calls currentUser to fetch the user’s account information. Upon
success, it assigns the user’s ID to a property called userId. In the
associated view, the v-if directive binds to the userId property and uses it
to decide whether to show the user a login prompt or the greeting.
The login and logout links have simple @click handlers that perform their
respective operations. The login handler uses the authEndpoint method to fetch
the path for GitHub authentication and then performs the necessary redirect.
The logout handler simply clears the JWT from local storage as previously
described.
Application logic
Now that the application supports authentication, it’s time to add the bookmark
management CRUD. Each bookmark document includes a URL, a title, the ID of the
owner, a creation timestamp, and a boolean value to indicate whether the
bookmark is public or private. The application stores the bookmark documents in
a collection called bookmarks.
My application includes a simple form that lets the user input the bookmark
title and URL. When the user clicks the Add button, the event handler performs
a store query on the bookmarks collection, inserting a new document with
the properties bound to the form fields:
<div class="add-bookmark">
  <h2>Add New Bookmark</h2>
  <input type="text" v-model="newBookmark.url" placeholder="URL" />
  <input type="text" v-model="newBookmark.title" placeholder="Title" />
  <button @click="addBookmark">Add</button>
</div>
const horizon = Horizon();
const bookmarks = horizon("bookmarks");

const app = new Vue{
  el: "body",
  data: {
    userId: false,
    newBookmark: {url: "", title: ""}
  },
  ready() {
      if (horizon.hasAuthToken())
        horizon.currentUser().fetch().subscribe(user => this.userId = user.id);
  },
  methods: {
    login(ev) {
      horizon.authEndpoint("github").subscribe(endpoint =>
        window.location.replace(endpoint);
    },
    logout(ev) {
      Horizon.clearAuthTokens();
    },
    addBookmark(ev) {
      bookmarks.store({
        user: this.userId,
        bookmark: this.newBookmark,
        time: new Date(),
        shared: false,
      });

      this.newBookmark = {url: "", title: ""};
    }
  }
}
To display the user’s bookmarks, the application uses a findAll query that
filters on the user field. I put the query in the currentUser callback so
that it will wait until the ID is available.
horizon("bookmarks").findAll({user: this.userId})
                    .order("time", "descending").limit(50).watch()
                    .subscribe(bookmarks => this.bookmarks = bookmarks);
The watch method at the end of the query tells Horizon to provide live updates
as the user’s bookmarks change. The subscribe callback triggers every time
there is an update. The bookmarks parameter gets an array with the user’s
first 50 bookmarks in descending order. In the callback, the application takes
the bookmark array and assigns it to a property on the Vue instance.
Using Vue’s v-for directive, it’s easy to set up data bindings that display
the bookmarks array in the application’s user interface:
<div class="bookmark" v-for="item in bookmarks" track-by="id">
  <a href="{{item.bookmark.url}}">{{bookmark.bookmark.title}}</a>
  <a @click="remove(item)">Delete</a>
  <a @click="toggleShare(item)">
    {{item.shared ? "Unshare" : "Share"}}
  </a>
</div>
The click handler for the “delete” link removes the object from the underlying Horizon collection:
remove(item) {
  bookmarks.remove(item);
}
When Horizon completes the remove operation, it pushes an updated version of
the bookmark array to the findAll query. When the callback assigns the new
bookmarks array to the Vue instance property, the data bindings kick in and
update the HTML content to make it conform with the latest data: the deleted
bookmark disappears from the user interface.
When the user shares a bookmark, the application simply replaces the document in
the collection with a new version of the document that has the shared
property set to true:
toggleShare(item) {
  item.shared = !item.shared;
  bookmarks.replace(item);
}
I used a similar approach to make it possible for users to edit the bookmark’s
URL and title. The application displays a form like the one used for adding a
new bookmark–but when the user saves, it replaces the existing document instead
of creating a new one. On the backend, Horizon relies on the document’s id
attribute to determine which document to replace.
In addition to displaying the user’s own bookmarks, the application also
displays a stream of public bookmarks shared by other users. The public feed is
powered by a Horizon findAll query, much like the one that displays the user’s
own bookmarks. Instead of filtering on the user’s ID, however, it filters on
the shared property:
horizon("bookmarks").findAll({shared: true})
                    .order("time", "descending").limit(50).watch()
                    .subscribe(bookmarks => this.publicBookmarks = bookmarks);
In the subscribe callback, it assigns the bookmarks array to a Vue instance
property called publicBookmarks. The frontend binds to that array and displays
the contents, just like it does with the user’s bookmarks. I chose to
encapsulate the bookmark presentation in a simple Vue component that I reuse for
both the public stream and the private stream.
Permissions

When you are ready to add permissions to your application, you will want to run
Horizon without the --dev flag so that you can ensure that your permissions
work as expected.
Horizon’s permission system relies on a query whitelist. When a client performs a query, the Horizon server compares the query with whitelist entries until it finds one that matches. If no matching entry is found in the whitelist, the server rejects the query. Each entry consists of:
- A unique identifier that describes the purpose of the rule
- A group name that specifies the scope of the rule and the users who are affected by its enforcement
- A template that describes the structure of the query, including object attributes
- An optional validation function written in JavaScript that performs arbitrary checks on the data affected by the user’s query
Application developers can define custom groups to limit the scope of permission
rules. Horizon comes with a default group that applies to all users. There’s
also an authenticated group for rules that apply only to users who are logged
in.
Horizon permissions are typically defined in a schema toml file, which also
describes the application’s collections and indexes. When you write or modify
your application’s schema file, you have to load the updated rules into
Horizon’s internal database.
Horizon’s hz command line tool has a set-schema option that lets the user
load schema configuration from a file into the database. You can also use
hz get-schema to fetch the current configuration from the database. When you
start working on permissions, you will probably want to fetch the default schema
so that you have a starting point for writing your own. It includes any
collections and indexes that Horizon generated automatically while you were
prototyping your application. Out of the starting gate, the application’s schema
looks like this:
[collections.bookmarks]
indexes = ["shared_time","user_time"]

[groups.admin]
[groups.admin.rules.carte_blanche]
template = "any()"
With developer mode enabled, Horizon automatically creates the shared_time and
user_time compound indexes to handle the findAll queries. The
carte_blanche rule for the admin group makes it so that administrators can
perform any query.
The bookmark demo application needs to enforce the following security constraints:
- All users get read-only access to the public stream of shared bookmarks
- Authenticated users get access to their account info
- Authenticated users get to add new bookmarks that belong to them
- Authenticated users get read/write access to their own bookmarks
To enforce the first constraint, the application schema includes a simple rule
that universally enables the findAll query on shared bookmarks:
[groups.default]
[groups.default.rules.fetch_public_bookmarks]
template = "collection('bookmarks').findAll({shared: true})"
The rule operates on the default group, which means that it applies to all
users. The fetch_public_bookmarks identifier is an arbitrary name that I
picked to describe the rule. In the rule template, the object passed to
findAll shows what properties and values must be present in order for a user
query to successfully match. In this case, only a findAll query that looks for
shared bookmarks is allowed.
Allowing authenticated users access their own bookmarks requires a very similar
whitelist entry. Instead of {shared: true} in the findAll template, it uses
{user: userId()}:
[groups.authenticated]
[groups.authenticated.rules.fetch_own_bookmarks]
template = "collection('bookmarks').findAll({user: userId()})"
In a whitelist entry template, the userId function resolves to the ID of the
user who performs the query. In this case, the template only matches if the user
is filtering for bookmarks where the value of the user property is their own
ID.
The currentUser method also performs a query under the hood, so the
application will need a rule that specifically allows querying the users
collection and fetching the record that corresponds with the user’s ID:
[groups.authenticated.rules.read_current_user]
template = "collection('users').find({id: userId()})"
To allow users to create new bookmarks, the whitelist needs a rule that matches
store queries. Once again, the template must use the userId function to
ensure that users only create bookmarks that belong to themselves:
[groups.authenticated.rules.store_bookmark]
template = "collection('bookmarks').store({user: userId(), time: any(), shared: any(true, false), bookmark: any()})"
The rule also performs some light checking on the other attributes in the new
object in order to ensure that it has roughly the right shape. The any()
function by itself indicates that any value is acceptable for the property. You
can also pass specific values to any to indicate that only those are allowed.
For example, specifying any(true, false) for the shared property ensures
that shared is always a boolean. If the user tries to insert an object that
lacks any of the specified properties, the query will fail because it doesn’t
match the template.
Validator functions
To support bookmark removal, the whitelist needs a rule that matches remove
queries. In this case, the template system by itself isn’t capable of expressing
a rule that prevents users from deleting bookmarks that belong to other users.
The whitelist entry needs a validator function:
[groups.authenticated.rules.delete_own_bookmarks]
template = "collection('bookmarks').remove()"
validator = "(user, oldVal, newVal) => oldVal.user === user.id"
Horizon uses a transaction-like system to apply validator logic. Horizon performs the query, evaluates the validator, and then rolls back the query if the validator returns false. The validator function gets to see what the affected document looks like before and after the query is performed so that it can make sure that the outcome is actually the desired result.
The validator function gets three parameters: a context object that contains the user’s account information, the original state of the document before the query, and the new state of the document after the query.
To make sure that the user doesn’t delete another user’s bookmark, the validator
compares the bookmark’s user property to the user’s ID to ensure a match.
Conclusion
When you finish defining your permission rules in the schema.toml file,
remember to use hz set-schema schema.toml to push the latest version into the
Horizon backend.
You can browse the Thinkmark repository on GitHub to see the bookmark manager’s complete source code, including the schema file.
Ready to deploy your application? Check out Digital Ocean’s One-Click Horizon droplet. For more details about Horizon, you can refer to the official documentation.
Further Reading
- Horizon authentication documentation
- Horizon permissions documentation
- Complete source code of the Thinkmark demo